Archive for the ‘Uncategorized’ Category

Rocker Failure!

Posted: April 22, 2015 in Uncategorized

I was at the track last Saturday when I immediately lost power on the straight. I was pushing 7000rpm at the time. This was mid-day and put quite a few laps through the kart. The exhaust rocker simply snapped in half at the weakest point. I was a bit upset considering these are $150 CNC rockers made by Raceseng. I would have never expected these to fail. I guess the stress, heat, and fatigue limit got to it. I decided to buy a pair of 1.2 ratio Gage Ultralite roller rockers for $195. Very similar to the Raceseng Rev Roller Rockers.

Warning: Raceseng apparently stopped making kart parts. These rockers may not be available very long. This is why I chose the new Gage rockers. They look a lot more solid than the Rev Rockers by Raceseng. I’d spend the extra 50 bucks and get roller rockers such as Gage. RS Rev Rockers wont last forever in a highly modified GX200 clone. See link: https://www.facebook.com/KartPartsDepotcom/posts/10203042384326326

Busted 1.2 Ratio Rev Rockers from Raceseng

Busted 1.2 Ratio Rev Rockers from Raceseng

New Gage Rockers on the left and broken RS rockers on the right. Both are 1.2 ratio.

New Gage Rockers on the left and broken RS rockers on the right. Both are 1.2 ratio.

2015 Season!

Posted: March 28, 2015 in Uncategorized

The winter is slowly starting to die down here in New York. It’s about time I got the Margay ready for some action. The local track (Oakland Valley Race Park) is scheduled to open April 1st, so I’m ready to finally hit the track after a long winter.

I took the kart into the shop to make a few adjustments. I was able to get sensors for the ancient digatron, adjust the seat, check valve lash, replace the chain, and clean grime/dirt off the frame. General maintenance like this goes a long way.

Side view of the Margay

Side view of the Margay

Raceseng rocker arms. Lash was off quite a bit. I usually set the IN to .003" and EX to .004"

Raceseng rocker arms. Lash was off quite a bit. I usually set the IN to .003″ and EX to .004″

Engine is pushing 16-17hp.

Engine is pushing 16-17hp.

"Ass Armor" as I call it. Small sheet of aluminum keeps me from scraping the fiberglass on the seat.

“Ass Armor” as I call it. Small sheet of aluminum keeps me from scraping the fiberglass on the seat.

IMG_3543

Rear Chassis Makeover

Posted: September 5, 2014 in Uncategorized

After MMX this summer, the chassis had two hairline cracks in the frame. The old hangars put too much stress on the tubing. I bought new steel hangars which distribute the stress 120 degrees around the tubing. This prevents force at a single point. The wheelbase was also decreased by 1-1/4″ (now standard length for most race karts). These pictures depict the entire process.

Old hangars removed. You can see the old one on the ground.

Old hangars removed. You can see the old one on the ground.

Initial hangar placement

Initial hangar placement

Brake setup

Brake setup

Brake setup

Brake setup

Brake setup

Brake setup

New hangars and cassettes

New hangars and cassettes

Completed rear axle assembly

Completed rear axle assembly

Rear axle assembly

Rear axle assembly

Mooresville Motorplex Photos

Posted: July 18, 2014 in Uncategorized

I had the privilege of going back out to MMX. However, now I was running an engine with over two times the displacement and power. Indeed, this changes things up a bit. Lap times from before (with the GX200) averaged about 1:08 at best. Now, I was hitting sub 1:00 times with engine issues. Even though I had carburetor flooding, I was still able to pull off a 59.2 second lap. The rentals at MMX cannot break 1:00. So this was certainly a good thing for me! Here are some pictures to show how the day went…

This slideshow requires JavaScript.

I was finally able to put parts in the GX440. It took 2 days to finally put the kart in order and tune the engine. I ran into numerous problems with the engine. The head I so carefully ported and milled was too much for ME to handle. The compression was so high on the engine (12.5:1) that I shredded a recoil starter and bruised my hand trying to start the thing. I ended up putting the Rev Roller Rockers on with a stock head. I will port the stock head when I get a chance. The 34mm Mikuni also needs a bigger main jet. The engine is cutting out at 6500rpm.

Here are some pics from this weekend:

Old, steel axle assembly is on the right weighing in at 15.5lbs. The new aluminum axle assembly is only 6.5lbs.

Old, steel axle assembly is on the right weighing in at 15.5lbs. The new aluminum axle assembly is only 6.5lbs.

New axle assembly

New axle assembly

Race brake rotor

Race brake rotor

New tie rods. Black anodized aluminum.

New tie rods. Black anodized aluminum.

92mm Piston

92mm Piston

Piston in hole (BDC). 440cc of power.

Piston in hole (BDC). 440cc of power.

Ported/Milled head with stainless valves.

Ported/Milled head with stainless valves.

Lapping valves

Lapping valves

Raceseng Roller Rockers at 1.3 ratio. These things are awesome.

Raceseng Roller Rockers at 1.3 ratio. These things are awesome.

Kart with working brake light. Brake light is actuated by a hydraulic switch.

Kart with working brake light. Brake light is actuated by a hydraulic switch.

Slammed it hard here. All 4 wheels locked up nicely.

Slammed it hard here. All 4 wheels locked up nicely.

Slammed it hard here. All 4 wheels locked up nicely.

Slammed it hard here. All 4 wheels locked up nicely.

Slammed it hard here. All 4 wheels locked up nicely. Good up-close view of the engine.

Slammed it hard here. All 4 wheels locked up nicely. Good up-close view of the engine.

Sweet new visor.

Sweet new visor.

I bought an extra GX390/340 cylinder head for about 25 bucks on ebay. This is a standard head with 42cc of clearance volume. Increasing the compression ratio can be done by milling the head. With this, every 0.007″ milled off the head decreased head volume by 1cc. Thus, milling 0.070″ would yield a 10cc decrease in head volume. Thus bringing the head volume to 32cc.

With the GX440 clone engines, the compression ratio is 10.0:1 stock (as advertised). This is with a 42cc head. Even though this compression ratio is high for most small engines, higher is better for greater torque and horsepower. I decided to mill this head down 0.075″ to yield a compression ratio of 12.5:1. This is the maximum compression ratio I can run with 104 octane race fuel.

You can easily find the compression ratio of your head. Check out the GX200 mods page to see a chart of already completed compression ratio combos. For this head and particular engine, the cylinder volume, or displacement is 439cc (commonly called the GX440).

So, your compression ratio equals:
(engine displacement + head volume + piston to head clearance volume)/
(head volume + piston to head clearance volume)

Your piston to head clearance volume is dependent on the height of you gasket. Basically, this value is the Bore*(distance of piston TDC to head). This is distance generally very low. usually .030″ or less. For the GX440 using a standard gasket, this value is approximately 6.78cc. So… for a quick sample calculation to find compression ratio with a head that was milled down 0.075″… first, you know that 1cc = 0.007″ skimmed off. This yields a decrease of 10.71cc. Subtract this from the stock head. The new head with 0.075″ milled off has a clearance of 31.29cc. Now, plug this value in the equation up top. You have:

(439cc + 31.29cc + 6.78cc)/(31.29cc + 6.78cc) = 12.53

12.53 is the new compression ratio. Again, this is a simple way of finding your desired compression ratio. Do some simple math to go from a compression ratio to mill height. Right below is an image of a table I made to show milling depths and associated compression ratios with octane requirements.

GX440_Mill_Depth

Now, for some pics:

IMG_2169

This is the head ready to be milled. I had to clamp it down as best as I could. This method worked pretty well.

IMG_2170

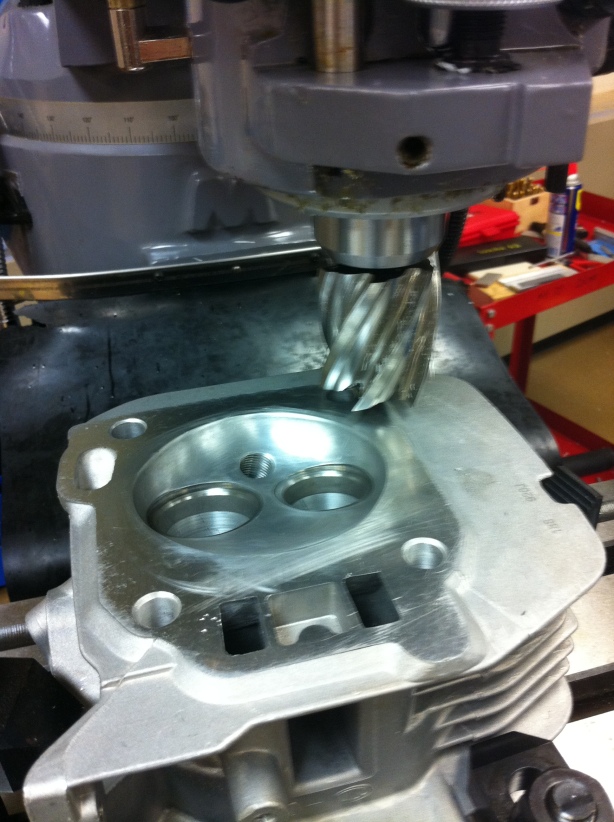
Picture above shows the head about to be milled. I zeroed the endmill to the head by lightly touching it. This barely skimmed any material off. Probably less than 0.001″. This endmill is a 1.750″ bit. It’s quite nice for a large head. Ideally, you would want a skimmer that takes the entire head on a pass. Well, those are expensive and rare. Only serious karting shops have these on hand.

IMG_2171

I was able to face the entire head in 3 passes. The bit was just wide enough to do so. The fewer side-to-side passes, the better. You want to reduce the amount of milling grooves. I took off 0.010″ per pass. You want to be gentle with a bit this large. Also, a slow milling speed is a good idea (500rpm). In all, I made 8 passes. 7 initial at 0.010″ and one final, slow finish pass at 0.005″. This made a nice cut.

Done milling

Done milling

Next, comes porting. Porting is basically the smoothing out of any rough edges and sharp radii in the cylinder head ports. I am still working on this… Here are a couple pics of the head polished up. IMG_2175

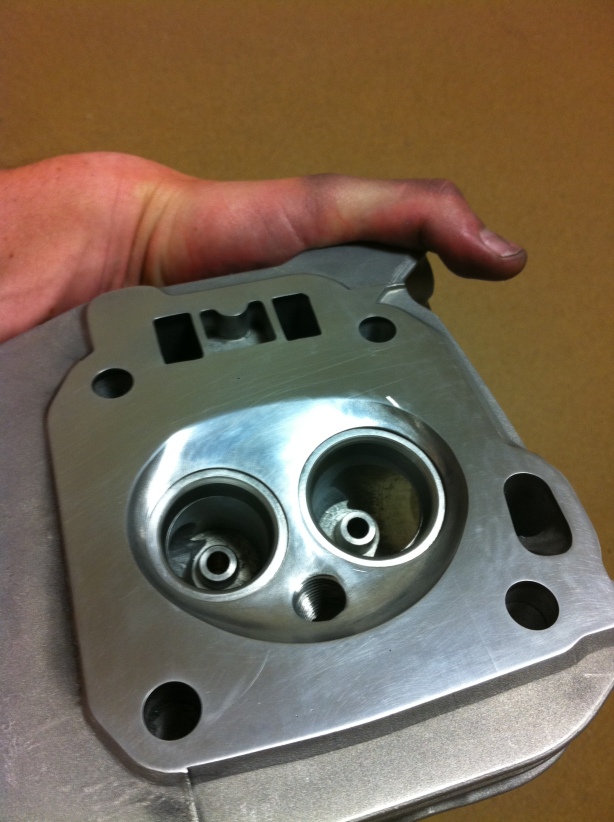
For these next 2 pictures, you can see that one port is much larger than the other. One port is the exhaust and the other is the intake. The large intake port has been enlarged and the overall radius is quite large. For the smaller exhaust port, this has not been enlarged yet. You can see the difference in sharp edges.

Unported exhaust port

Unported exhaust port

Ported intake port and polished head

Ported intake port and polished head

Polishing is the final step. As you can see, the head is quite nice. This reduces friction of the gasses in the ports and head. Also reduces carbon build up. Carbon loves to stick on cast parts due to the rough surface. This minimizes the occurrence. Plus, polishing the ports like in second to last picture reduces your head loss. Less friction means better flow.

I hope this helps those out there wanting to mill their heads down. It can be difficult to get to a mill. However, it is a huge performance mod that can be done for free. Porting is also free with the right tools and a few hours of free time and patience. I recommend porting any head for a noticeable performance boost. After my first ported GX200 head, I immediately noticed the increased acceleration and engine response.

Happy engine building!

WOW! That’s all I have to say about these rockers. They rock! Quite literally…

I bought some rev rockers for my GX200 last year. I was very impressed. However, I was hesitant on buying the new GX390 Rev Roller Rockers from Raceseng due to the astronomical cost. At around $200 from Parson’s Racing Supply, these rockers are expensive. However, when you open the box and see them, you know where the money went. These are top of the line CNC machined rockers. Very high quality and beautiful. I can’t wait to put them in the GX440. I went with the 1:1.3 ratio rockers. There is a 1:1.2 option and a 1:1.3 IN / 1:1.2 EX option.

IMG_0348

IMG_0349

Valve cover spacer also from RS. Very nice CNC spacer

Valve cover spacer also from RS. Very nice CNC spacer

This is the new and improved Tony Kart Replica with some personal mods. This includes brake cooling ducts, side crash bars, number plates, 5″x8.25″ DWT rims, WMS sprocket, and an updated rear brake rotor. I currently have all the parts minus ducts. Just gotta put it all on in June.

April_2014_model

GX440 Update

Posted: February 25, 2014 in Uncategorized

Here is a quick video of the kart in action. There is still a lot of work to be done on this engine and kart. However, not bad for a test run! About 27hp @ 6100 rpm.

New GX440 Clone Parts

Posted: February 13, 2014 in Uncategorized

So I have not received the GX440 Clone engine yet. However, I did buy a few parts that will be used on the engine and kart. I bought a 34mm Mikuni carb, spare cylinder head, and a Bully Turbo 1″ bore clutch.

New 34mm Mikuni next to the stock GX200 carb. Wow. And THAT thing is going on a kart...

New 34mm Mikuni next to the stock GX200 carb. Wow. And THAT thing is going on a kart…

New Bully Turbo Clutch. I've heard this is the best clutch in the world for big block kart engines.

New Bully Turbo Clutch. I’ve heard this is the best clutch in the world for big block kart engines.

New Bully Turbo Clutch. I've heard this is the best clutch in the world for big block kart engines.

New Bully Turbo Clutch. I’ve heard this is the best clutch in the world for big block kart engines.